Wedding Photobooth Ideas to Wow Your Reception Guests
- 3 days ago
- 9 min read
A wedding photobooth is one of the most underrated decisions you can make for your reception. Most couples assume it’s just a fun extra, something to fill a corner near the bar. The reality is that a well-placed, well-planned photobooth becomes the social heartbeat of your entire evening. Guests who might not dance will line up for a booth. Shy relatives loosen up. Groups form naturally. And at the end of the night, everyone goes home with a physical keepsake that outlasts the cake, the flowers, and even most of the formal portraits.
Table of Contents
Key takeaways
Point | Details |
Booth type shapes the budget | Open-air booths start around $500; 360-degree and mirror booths can reach $2,500 for a package. |
Timing and placement matter most | Running the booth during cocktail hour and the first two hours of reception drives the highest guest engagement. |
DIY is cheaper but riskier | Equipment costs $500 to $1,200 new, but lighting failures affect the majority of DIY setups. |
Prop quality beats quantity | A small, curated prop set consistently outperforms a large, cluttered one for guest participation. |
Hidden costs can surprise you | Idle time charges of $100 to $250 per hour catch many couples off guard when booking shorter packages. |
Wedding photobooth types: which one fits your day
Not every booth is created equal. The format you choose shapes the guest experience, the photo quality, and the overall vibe of your reception. Here is a breakdown of the four main styles worth knowing.
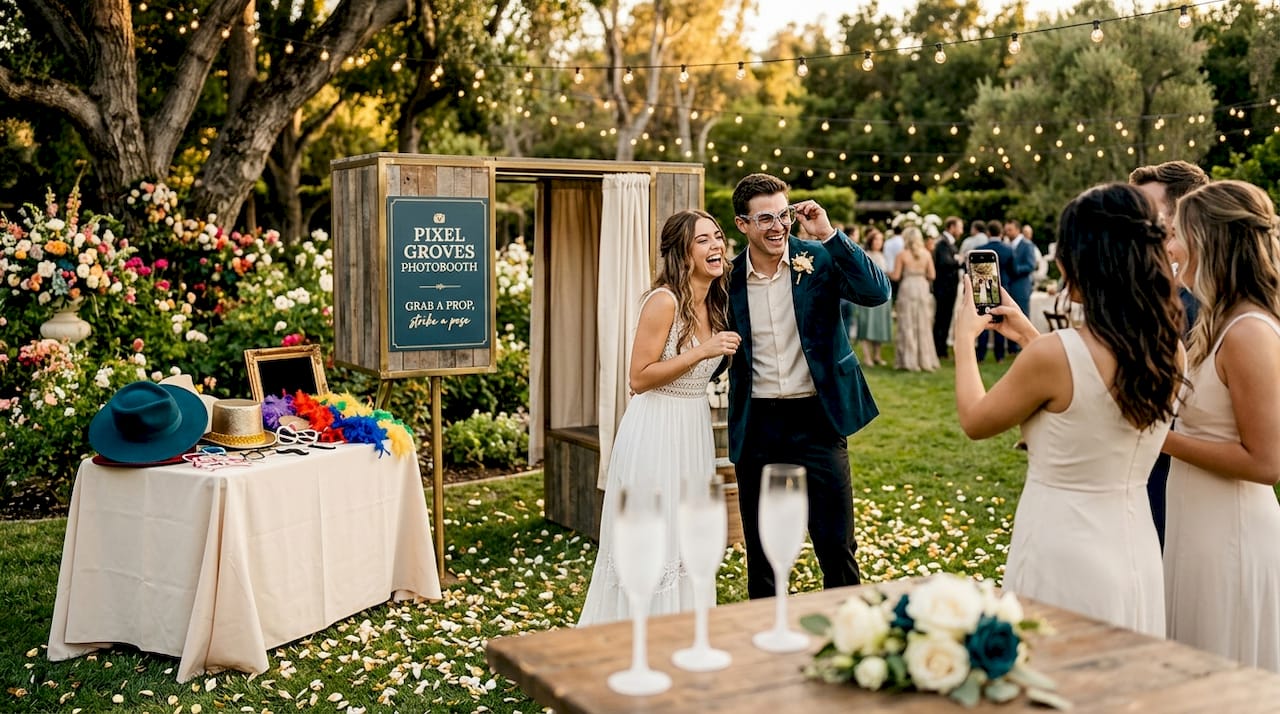
Open-air booths
Open-air booths are the most popular and accessible option. There is no enclosed box. Instead, guests stand in front of a backdrop while a camera on a stand captures the shot. This format works especially well for large groups because there is no size limit on who can squeeze into the frame. It also gives couples the most flexibility with fun wedding backdrop ideas, from lush floral walls to neon signs and custom fabric prints. Pricing for open-air setups typically falls in the $500 to $1,000 range for a standard package.
Mirror booths
Mirror booths look exactly like what the name suggests: a full-length mirror that doubles as a touchscreen camera. Guests tap the screen to trigger a countdown, sign their names digitally, and walk away with a printed strip. The glam-style aesthetic of mirror booths, complete with beauty filters and studio lighting, produces red-carpet-quality photos that guests actually want to post on social media. This style tends to cost more, typically landing in the $1,000 to $1,500 range depending on your market.
360-degree booths
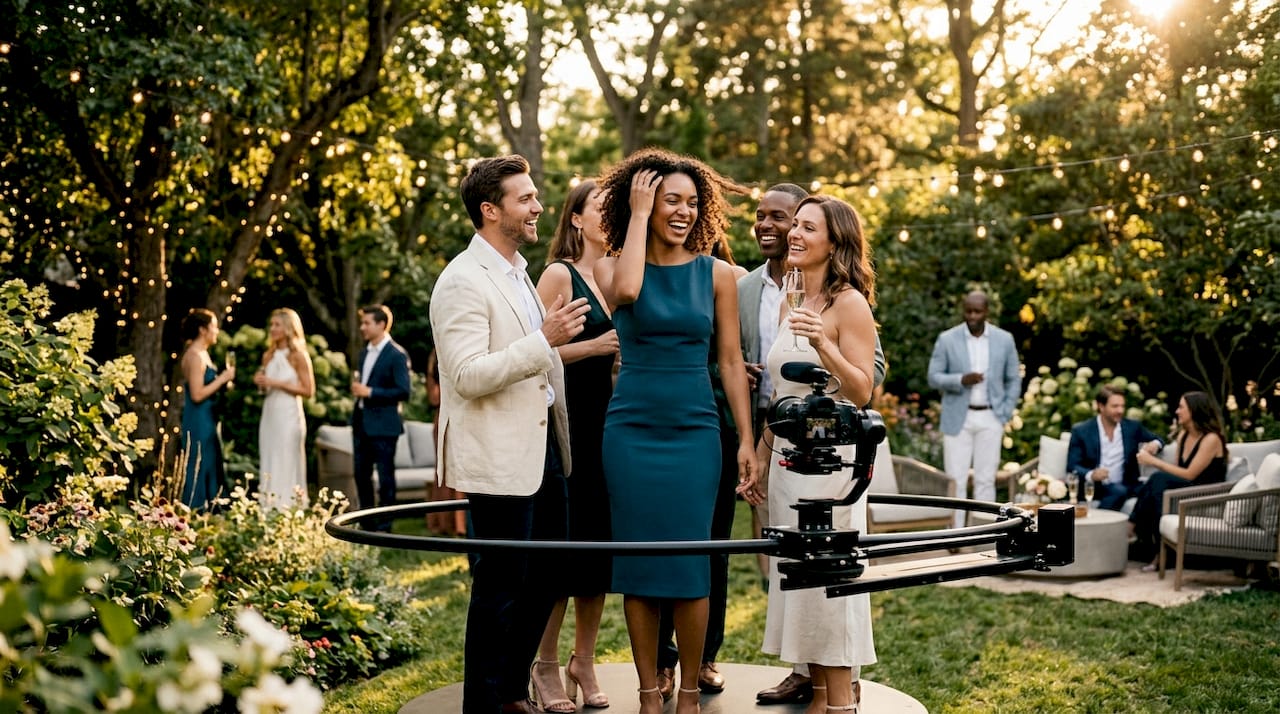
The 360-degree booth is the showstopper. Guests stand on a small platform while a camera arm rotates around them, capturing a slow-motion video clip from every angle. The output is a short, shareable video rather than a printed photo strip. These booths are a natural fit for couples who want high-energy, cinematic content from their reception. Expect to pay anywhere from $1,200 to $2,500 for this experience.
DIY setups
A DIY wedding photobooth is the budget-conscious alternative. You supply the camera, backdrop, lighting, and props yourself. The savings can be real, but so can the headaches. Here is a quick comparison to help you decide:
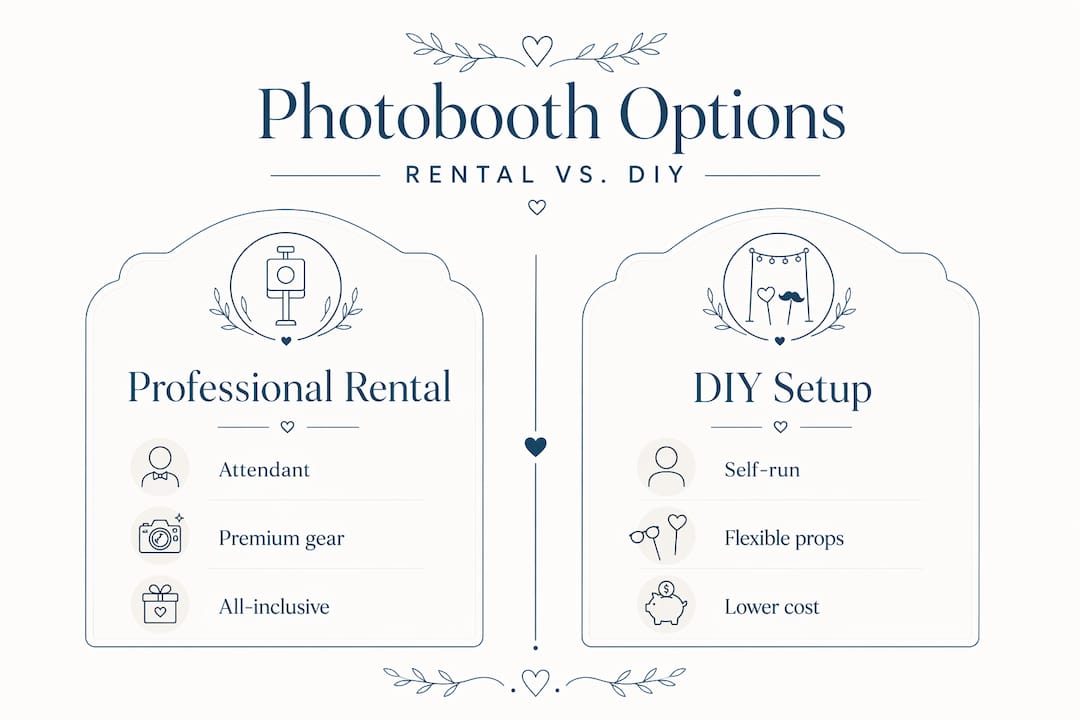
Feature | Professional rental | DIY setup |
Upfront cost | $500 to $2,500 | $500 to $1,200 (equipment) |
On-site attendant | Included | You or a friend |
Print capability | Usually included | Requires additional setup |
Photo quality consistency | High | Variable |
Setup time required | Handled by vendor | 2 to 4 hours minimum |
The DIY route makes sense if you already own photography equipment or are comfortable with basic lighting setups. For most couples, though, the time and stress saved by renting professionally is worth the extra cost.
Wedding photo booth rental costs explained
Understanding what drives the price of a wedding photo booth rental helps you budget without surprises. Costs break down into a few clear categories.
Booth type and duration are the two biggest factors. Rental packages typically cover three hours and include delivery, setup, a dedicated attendant, unlimited prints, and an online gallery of all photos. Open-air booths generally run $500 to $1,000 for that window. Mirror and 360-degree booths push into the $1,200 to $2,500 range for the same duration.
Add-ons are where costs climb quickly. Custom print templates with your names and wedding date, premium photobooth props for weddings, specialty backdrops, and digital sharing stations all carry additional fees. A custom backdrop alone can add $150 to $400 to your total. Props packages vary, but expect $50 to $150 for a curated set from most vendors.
Location and travel matter more than couples expect. Vendors serving remote venues or requiring travel beyond their standard service area often charge per mile or add a flat travel fee. This can add $75 to $200 to your final invoice depending on where your venue sits.
Pro Tip: Ask your vendor specifically about idle time charges before signing. Unused on-site hours can cost $100 to $250 per hour, and if your reception runs longer than your booked window, those charges add up fast.
Most vendors require a deposit of around 30%, with the balance due before or on the wedding day. Setup typically takes 60 to 90 minutes, so factor that into your venue arrival timeline when coordinating with your coordinator or planner.
Planning and maximizing the photobooth experience
Getting the most out of your wedding guest photo station is less about the equipment and more about the strategy behind it. A few smart decisions during the planning phase make a significant difference in how much guests actually use the booth.
Timing is everything. Photobooths perform best during cocktail hour and the first two to three hours of the reception. This is when energy is high, guests are mingling, and the evening has not yet shifted into wind-down mode. Running the booth during dinner service, when guests are seated and focused on eating, is one of the most common and costly timing mistakes couples make.
Placement drives participation. Positioning the booth near social hubs like the dance floor or cocktail bar increases the likelihood that guests will wander over organically. A booth tucked into a far corner of the venue, no matter how beautifully decorated, will see far less traffic than one placed where the energy already lives.
Here are a few additional wedding photobooth setup tips that make a real difference:
Keep the prop table visible and within arm’s reach of the booth entrance. Guests should not have to search for them.
Use clear signage. A simple photobooth sign for weddings with your names and a short instruction line removes hesitation for guests who have never used a booth before.
Coordinate with your DJ or emcee to make a brief announcement about the booth during cocktail hour. A single mention can send a wave of guests in that direction.
If you have children attending, designate a few props specifically for them. Kids become the best booth ambassadors at any reception.
Pro Tip: A smaller, curated prop selection consistently outperforms a large, overwhelming one. Pick 8 to 12 props that match your wedding theme and remove anything that feels generic or off-brand for your day.
DIY wedding photobooth: building a setup that actually works
If your budget is tight or you love a hands-on project, a DIY wedding photobooth can absolutely deliver. The key is knowing where the pitfalls are before you commit.
Here is a step-by-step approach to building a DIY setup that holds up on the day:
Choose your camera. A DSLR or mirrorless camera with a remote shutter trigger gives you the most control. Many couples use a tablet or smartphone with a dedicated photo booth app, which handles the countdown timer, filters, and digital sharing automatically.
Sort out your lighting first. This is the step most people skip, and it is the most important one. 64% of DIY photobooth photos suffer from poor lighting. The standard fix is two softbox lights positioned at 45-degree angles on either side of your subject. Budget $100 to $300 for a decent lighting kit.
Select your backdrop. Paper rolls, fabric panels, balloon walls, and sequin curtains all work well. Make sure the backdrop is wide enough for groups of four to six people. A minimum width of eight feet is a safe target for most wedding receptions.
Set up your tripod and frame your shot. A sturdy tripod in the $50 to $150 range is non-negotiable. Set your camera height at roughly chest level for the most flattering angle, and use tape on the floor to mark where guests should stand.
Test everything the day before. Run through the full sequence at least twice with different lighting conditions. DIY setups often fail to replicate professional lighting standards, and the only way to catch problems is to test before guests arrive.
Assign a dedicated helper. Someone needs to manage the booth during the reception. This is not a set-it-and-forget-it situation. A reliable friend or family member who understands the setup can prevent technical issues from ruining the experience.
DIY equipment costs range from $500 to $1,200 if purchased new, which can undercut professional rental prices. But factor in your time, the stress of managing it on your wedding day, and the risk of technical failure before deciding this is the right path.
What I’ve learned about photobooth moments that last
I have worked alongside couples at dozens of receptions, and the photobooth conversation almost always goes the same way at first. Couples see it as a nice-to-have, something they will figure out later. Then they watch the footage back and realize the booth captured moments their formal photography never could.
What I have seen consistently is that placement and timing matter far more than the booth type itself. A mid-range open-air booth positioned next to the bar during cocktail hour will outperform an expensive 360-degree booth stuck in a hallway every single time. The booth does not create the energy. It borrows it from wherever guests are already gathered.
The prop question is where I push back on couples the most. I have watched guests walk past a table overflowing with props without picking up a single one. Then I have seen a table with eight perfectly chosen items, matched to the couple’s aesthetic, get completely cleaned out within the first hour. Less is genuinely more here.
On the DIY versus rental debate: I respect the budget instinct, but I have seen too many DIY setups fail in ways that cannot be fixed mid-reception. Lighting is almost always the culprit. If you go DIY, spend the majority of your budget on lighting, not on a fancier camera.
And finally, do not overlook the physical print. Digital galleries are wonderful, but the photo strip someone tucks into their wallet or sticks on their fridge is what actually gets remembered. If your booth does not offer prints, that is a gap worth closing. You can explore creative wedding photo ideas that pair beautifully with a photobooth setup to round out your visual storytelling for the day.
— Kellie
How Pixelgroves brings your photobooth vision to life
[
At Pixelgroves, we know that a wedding photobooth is only as good as the experience surrounding it. Our photobooth rental packages are designed to integrate naturally with your full wedding day coverage, from the ceremony through the last dance. Every setup includes customizable print templates, curated prop collections, and on-site attendant support so nothing falls through the cracks. We won the 2025 Best of Florida Wedding Photographer Award because we treat every detail, including your photobooth, as part of the larger story we are telling. Explore our wedding photography packages and pricing options to find the right fit for your reception.
FAQ
How much does a wedding photobooth rental cost?
Most wedding photo booth rentals run between $500 and $1,500 for a three-hour package, with 360-degree and mirror booths reaching up to $2,500. Add-ons like custom backdrops and travel fees can increase the total.
When should the photobooth run during the reception?
The booth should operate during cocktail hour and the first two to three hours of the reception, when guest energy and mingling are at their peak. Scheduling during peak activity maximizes use and keeps the experience feeling lively rather than like an afterthought.
What is included in a typical photobooth rental package?
Most packages include delivery, setup, a professional attendant, unlimited prints, and an online photo gallery. Vendors typically arrive 60 to 90 minutes early to calibrate lighting and test the software before guests arrive.
Is a DIY wedding photobooth worth it?
A DIY setup can save money if you already own equipment, but lighting failures affect the majority of DIY setups and are difficult to fix during a live event. For most couples, the reliability and quality of a professional rental justify the additional cost.
What props work best for a wedding photobooth?
Stick to 8 to 12 props that match your wedding theme and color palette. Curated prop selections consistently drive more guest participation than large, generic prop tables, and they photograph better too.
Recommended
Comments